Overview
During a 6-month internship and continued work at Froströk, I contributed to progression systems, onboarding, abilities, and cross-team pipelines for an ARPG in development.
My work focuses on designing systems with clear player intent, building tools that support team collaboration, and ensuring features are both scalable and intuitive.
(Details are adapted due to NDA.)
Designing Progression Systems
Multilayered Modular Progression System
This system introduces a layered upgrade mechanic that lives inside the player’s hub. It’s built to reward engagement, experimentation, and smart decision-making, and is structured around a three-part item hierarchy:
Tier 1 – Hub Interactable Device
A core object in the player’s home base, with a limited number of input slots. These slots accept upgrade units earned from more challenging gameplay. The device acts as a secondary upgrade path that gives players a way to boost their character beyond just equipping new gear.Tier 2 – Modular Units
These are earned from mid- to high-effort content and serve as containers for further upgrades. Their power and flexibility scale with the difficulty of the encounter they came from. Each one:Rolls a randomized number of internal slots
May feature linked connections between slots, enabling synergy between inserted components
Tier 3 – Insertable Fragments
Collectible pieces marked with visual symbols or patterns. When slotted into a modular unit:They enhance player stats or combat behavior
Some specific sequences unlock hidden bonuses like additional passive effects that players can discover through experimentation
Goal-Oriented Progression Loop
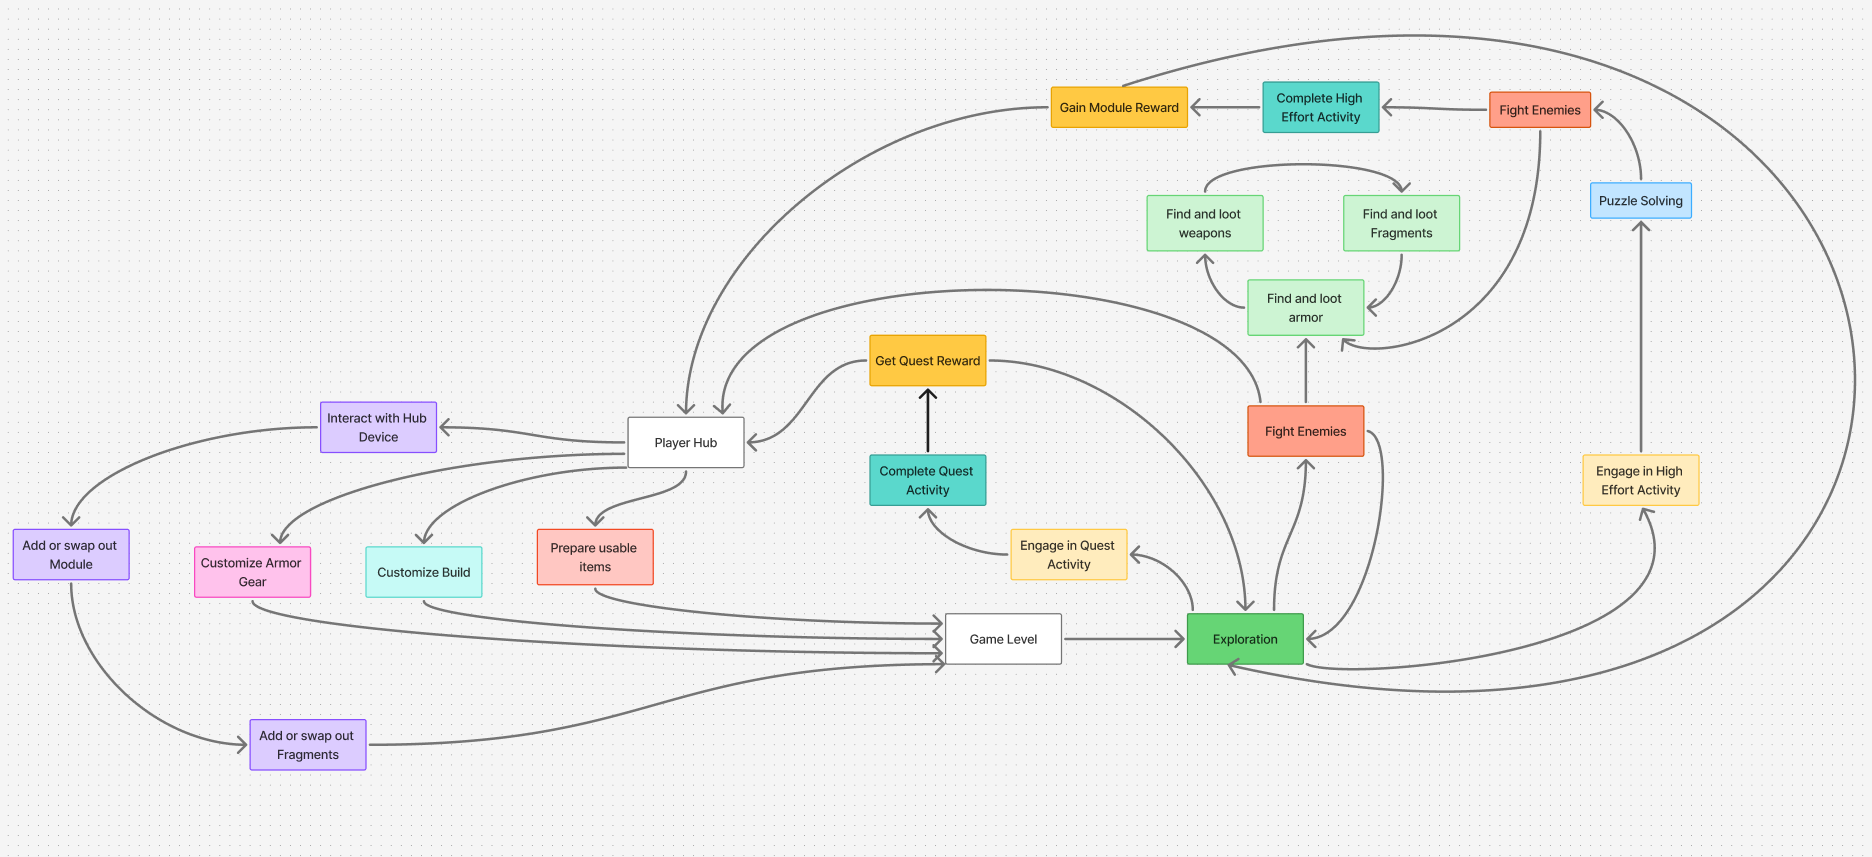
Design Intent
This system is built to deliver a steady, rewarding sense of power growth as players make their way through the game. It’s not introduced right away. Instead, it becomes available midway into the experience, once players have a solid grasp of the core combat and exploration. At that point, it opens up a new layer of progression that rewards effort, curiosity, and experimentation.
The goal is to make players feel like every step forward, every challenge completed, brings them closer to something meaningful.
That moment of “Wow! I got a new one of those module things!” should naturally lead to: “Next time I get back to the hub and plug this in, I can experiment with my fragments, and then I’ll be stronger the next time I head out.”
Key intentions:
- Building Curiosity Through Foreshadowing
Players start encountering early fragments well before the full system is explained. These drops spark questions like “What is this used for?” and plant the seed that something deeper is coming. It’s a subtle way to build mystery and anticipation, without frontloading mechanics. - Teaching Through Gameplay
Once the system is unlocked, players begin to learn, simply by playing, what kinds of content yield modular units. Dungeons, rare encounters, or elite enemies become the gateway to progression. As players repeat this content, they start noticing patterns: higher-tier modules have more slots, different layouts, and more potential. The system teaches itself through use. - Discovery as an Emotional Hook
The real payoff comes when players uncover secret configurations. Placing the right inserts in the right order triggers special bonuses or effects. It’s not just about stats, it’s about having that “aha” moment. The system rewards players who experiment and explore, making them feel smart, observant, and creative. - Build Identity & Player Expression
Because module layouts vary, and inserts can be mixed and matched, each player ends up with a build that reflects their personal approach. Maybe one player prioritizes damage, another builds around utility effects. The system aims to be flexible enough to support different styles, and that sense of ownership reinforces long-term investment.
And if a module doesn’t quite fit their build or preferences, the player can always head back out, driven by the goal of finding one that suits their playstyle better. - Community-Driven Discovery
The most powerful combinations aren’t explained by the game, or even that they exist. They’re meant to be discovered, tested, and shared by the player community. This encourages players to talk, post, theorycraft, and explore the system together, creating a shared space for puzzle-solving and mastery that extends outside the game itself.
Tools used

Used for creating UI elements and visual mockups to be used with Adobe XD to create an interactive prototype.

Prototyped the full UI/UX of the customization interface to prove the concept of customization and discovery. Including animations and placeholder SFX to help validate the core interactions.
First-Time User Experience, Onboarding Flow & Quest Design
I designed the onboarding experience that introduces players to the game’s core mechanics and pacing during the first 15–20 minutes of gameplay. My focus was on creating a smooth, intuitive introduction that maintains immersion while guiding the player through essential systems.
Working closely with the Creative Director, I helped define what mechanics should be introduced and in what order, including basic combat, evasion, and enemy encounter flow, and created a detailed flowchart to communicate the desired player experience and learning progression.
To support this design, I arranged documents of Quest Design Philosophy that outlined the usage of Unreal’s Gameplay Tag structure to track tutorial progression hierarchically (e.g., Quest.Tutorial.Attack > Quest.Tutorial.Attack.Kill > Quest.Tutorial.Attack.Completed). This tagging system would also drive contextual UI prompts to surface key mechanics at the right time, without breaking the flow of gameplay.
I also created placeholder Level Sequence events to showcase key moments intended to evoke a specific feeling for the game’s world and tone. These early prototypes were used to help communicate the intended emotional beats and transitions during the onboarding flow.
In combination to this I also designed the enemies to be used for this experience, which includes 1 type of basic enemy and 1 boss. I’ll talk more about that further down.
Tools used
Used to create a detailed flowchart outlining the onboarding experience, mapping out when core mechanics, enemy types, and key moments should be introduced.
Prototyped placeholder Level events within the engine to represent key scripted moments and narrative beats. These prototypes were used to communicate the narrative delivery.
To accompany the flowchart I also arranged documentation of Quest Design Philosophy, as well as the Onboarding Quest to communicate when Gameplay Tags should be applied and control the progression.
Item Design
I developed and maintained a designer-facing spreadsheet that streamlines the process of creating and balancing weapons for the game. This tool was designed to allow rapid iteration and data control, with future scalability and creating an external tool in mind.
Design Tool & Workflow
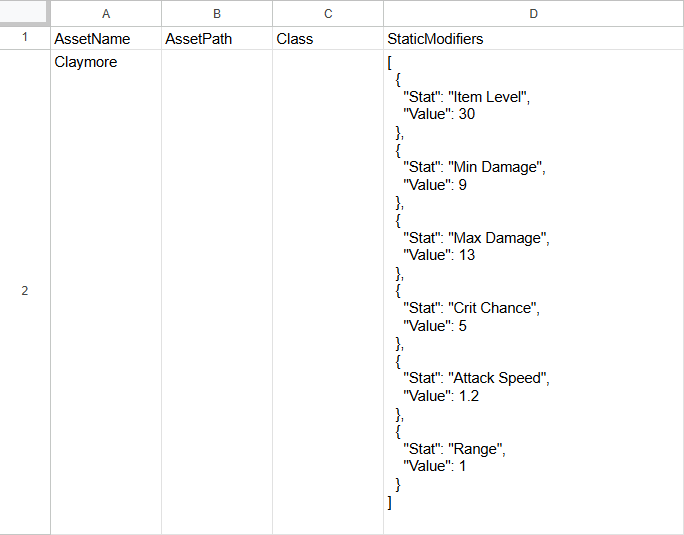
I created a structured spreadsheet template for weapon creation of a variety of weapon types, allowing me (and future designers) to quickly define core properties such as:
Item Level
Static Modifiers (e.g., Base Attack Damage, Attack Speed)
Additional Modifiers and behavior-enhancing stats
The core of the system is a data sheet that reads and compiles design input into a JSON list, which can then be exported as a CSV for direct import into the game project. This workflow ensures clean data formatting while allowing for detailed control over each weapon’s configuration.
The spreadsheet is also set up with future external tool integration in mind. Serving as a foundational format that can scale into more complex item pipelines or live-tuning environments.
Weapon Preview Tool
To help visualize how weapons perform in-game, I built a Weapon Viewer that shows the final damage output after factoring in the player’s current gear and attributes.
It’s mainly used to quickly check if a weapon behaves as expected across different builds, especially when tweaking scaling or progression pacing. It gives a clear overview without needing to jump into a full test environment every time.
The tool shown in the video is intentionally lightweight and stripped down, but still shows the core intention of the tool. More complex features were left out to keep it NDA-safe.
Going forward, I plan to extend this tool to simulate basic combat scenarios, such as calculating amounts of hits to defeat an enemy or boss. This will help with tuning either the weapon damage or the enemies health, and making sure the damage output feels both fair and empowering.
Tools used
Used to build and manage item libraries categorized by type, giving me a clear overview of all items and their properties. I also used built-in charting tools to visualize progression curves, such as how weapon strength scales over time.

Implemented custom scripts to simulate item generation logic and automate data handling. These scripts allow me to fetch and push structured JSON data into sheets, enabling quick export for use in-game.
Combat Design
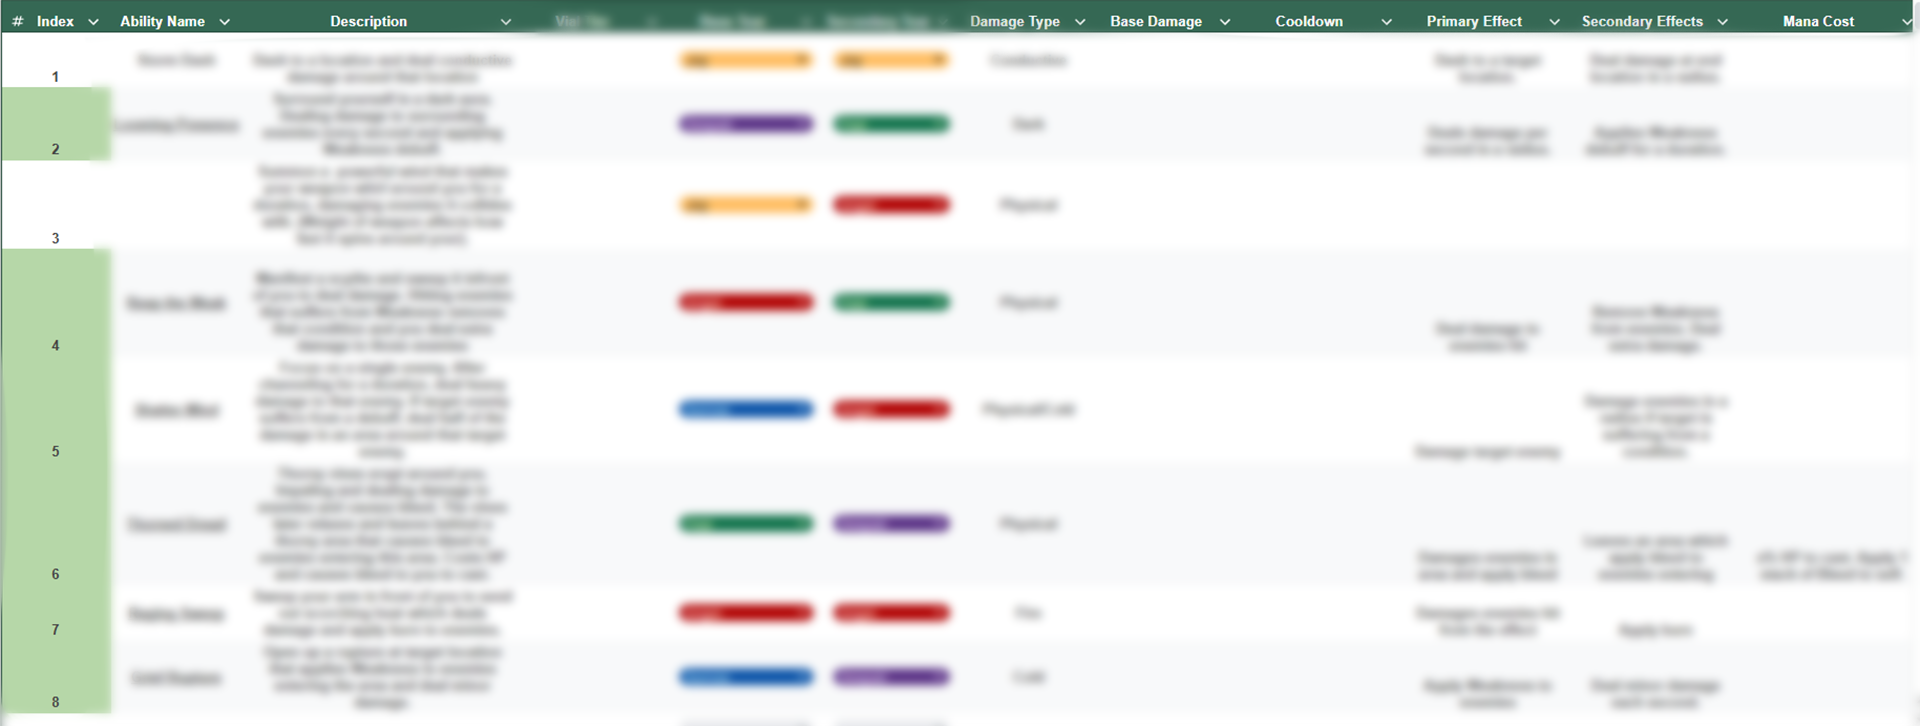
To support the design and implementation of combat abilities, I created and maintained a centralized Ability List document. This served as both a creative design hub and a coordination tool across departments.
Each ability entry includes:
A short description and intended gameplay use
How the ability is acquired or unlocked
Damage type, effect type, and internal tag filters for integration
A direct hyperlink to a collaboration sheet for animation, VFX, and SFX
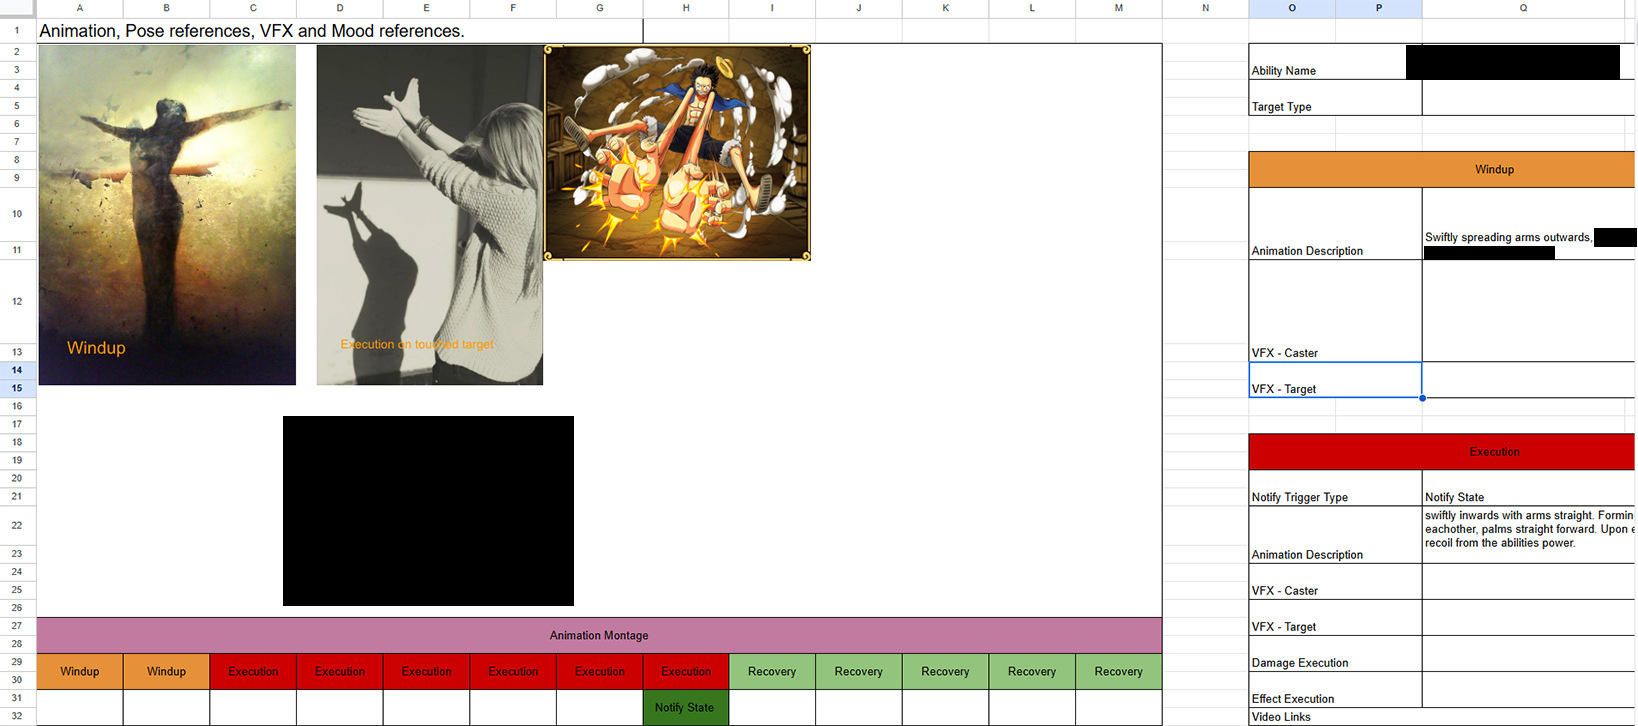
Collaboration Approach
The linked documents go deeper into the feeling, tone, and visual intent behind each ability. For each ability, I can include information such as:
Reference images for poses, elemental effects, and visual style
Links to video references demonstrating timing or inspiration
A rough animation montage timeline showing when key moments should happen (e.g., when the windup begins, when the hit should land, etc.)
- Additional detailed information about VFX location, target type etc.
This setup has been well received by the team and makes it easy to understand what each ability or attack is aiming to achieve. It gives everyone a clear starting point, while still leaving room for their own interpretation. Something we can later refine together through feedback from me or the Director.
Ability Acquisition & Design Intent
The way players acquire abilities is closely tied to the same design philosophy behind the previously described progression system: discovery through experimentation. Rather than simply unlocking abilities through a linear path or level-up menu, abilities are tied to a separate system that encourages players to explore, try new things, and uncover abilities in a unique way.
Due to NDA restrictions, I can’t go into detail about the exact mechanics — but I’ve had full ownership of this design, including how the acquisition logic connects to progression, and how it supports the overall sense of player-driven growth.
When designing abilities, my goal is to offer a wide variety of effects and use cases that allow players to experiment with different builds and playstyles. Rather than guiding players toward a fixed loadout, I aim to support creative combinations and encouraging the community to theorycraft, share discoveries, and shape their own combat identity.
Tools used
I used spreadsheets to manage the full ability list, including names, descriptions, acquisition methods, damage types, and internal tags. Each entry also included hyperlinks to shared documents for animation, VFX, and SFX.
I used Figma to draft the ability acquisition flow and early UI layout concepts. It helped me communicate how abilities tie into the progression system and provided a visual reference for discussing structure, pacing, and player feedback with the rest of the team.
I built an interactive prototype in Adobe XD. This mockup focused on how players would navigate ability acquisition and equipment menus. It included animated transitions and clickable states to showcase the intended feel and usability of the interface.
Enemy Design
When designing enemies, I’ve followed a similar workflow to how I approach abilities — keeping things structured, clear, and easy to collaborate on. The enemies I designed is, as I mentioned previously, meant to be part of the onboarding experience of the game.
Each enemy starts with a written breakdown in Notion, where I describe the design philosophy, their core behavior, movement style, and how they’re meant to challenge the player and for them to beat the enemy. I then link to a shared spreadsheet that goes deeper into the design, including:
Visual and tonal references for how they should move, feel, or behave
Descriptions of any special abilities they use
Notes on things like timing, telegraphing, and their place in the overall difficulty curve
Just as with the Ability Design documents, these are meant to give animation, VFX, and SFX teams a clear starting point. Not just the mechanics, but the tone and personality of each enemy. It creates a shared vision that still leaves room for creative input as we iterate together.
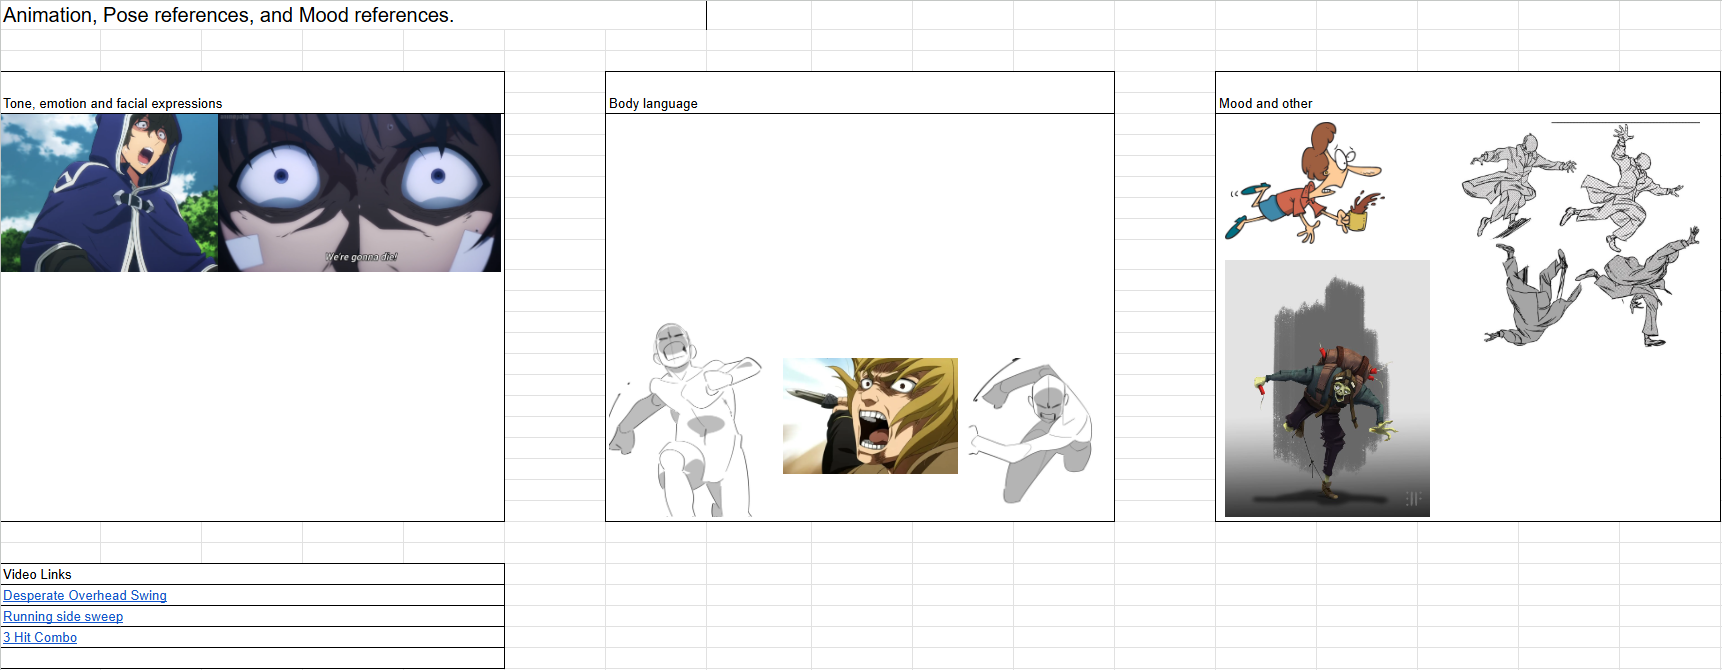
For the basic enemy, I wanted to set the tone by making them feel desperate, clumsy, and slightly afraid. Giving the impression that they’re barely holding themselves together in combat. This contrast was intentional, as it sets the stage for the boss encounter that follows.
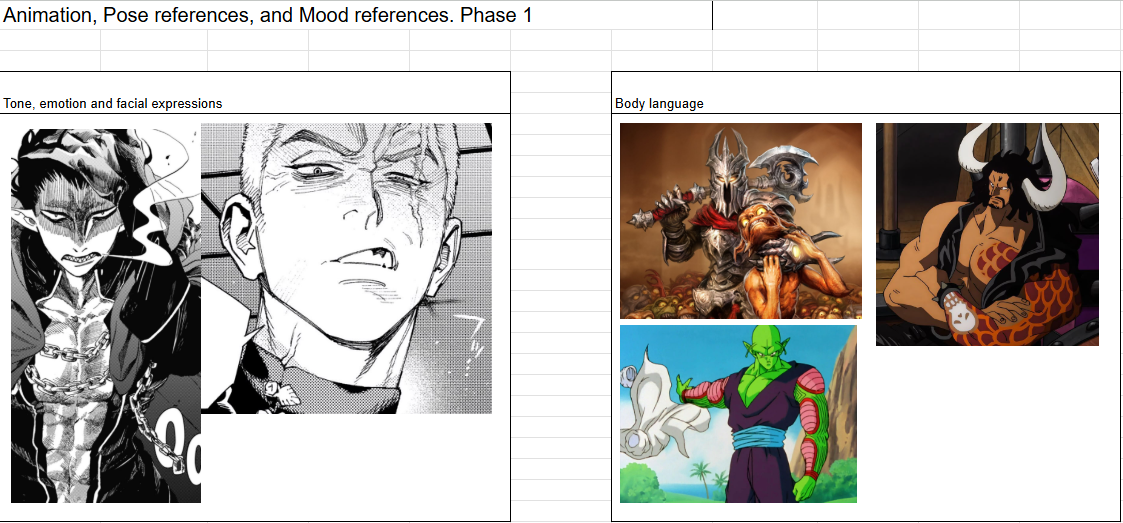
The boss, in comparison, carries a more arrogant and commanding presence. The kind of character who steps in with a “Fine, I’ll handle this myself” attitude. That shift in tone is also reflected in the boss’s animations and attack patterns, which are more deliberate, collected, and strategically paced.
There’s more planned in terms of how these personalities play out mechanically and visually, but those details will have to wait until they can be shared more openly.
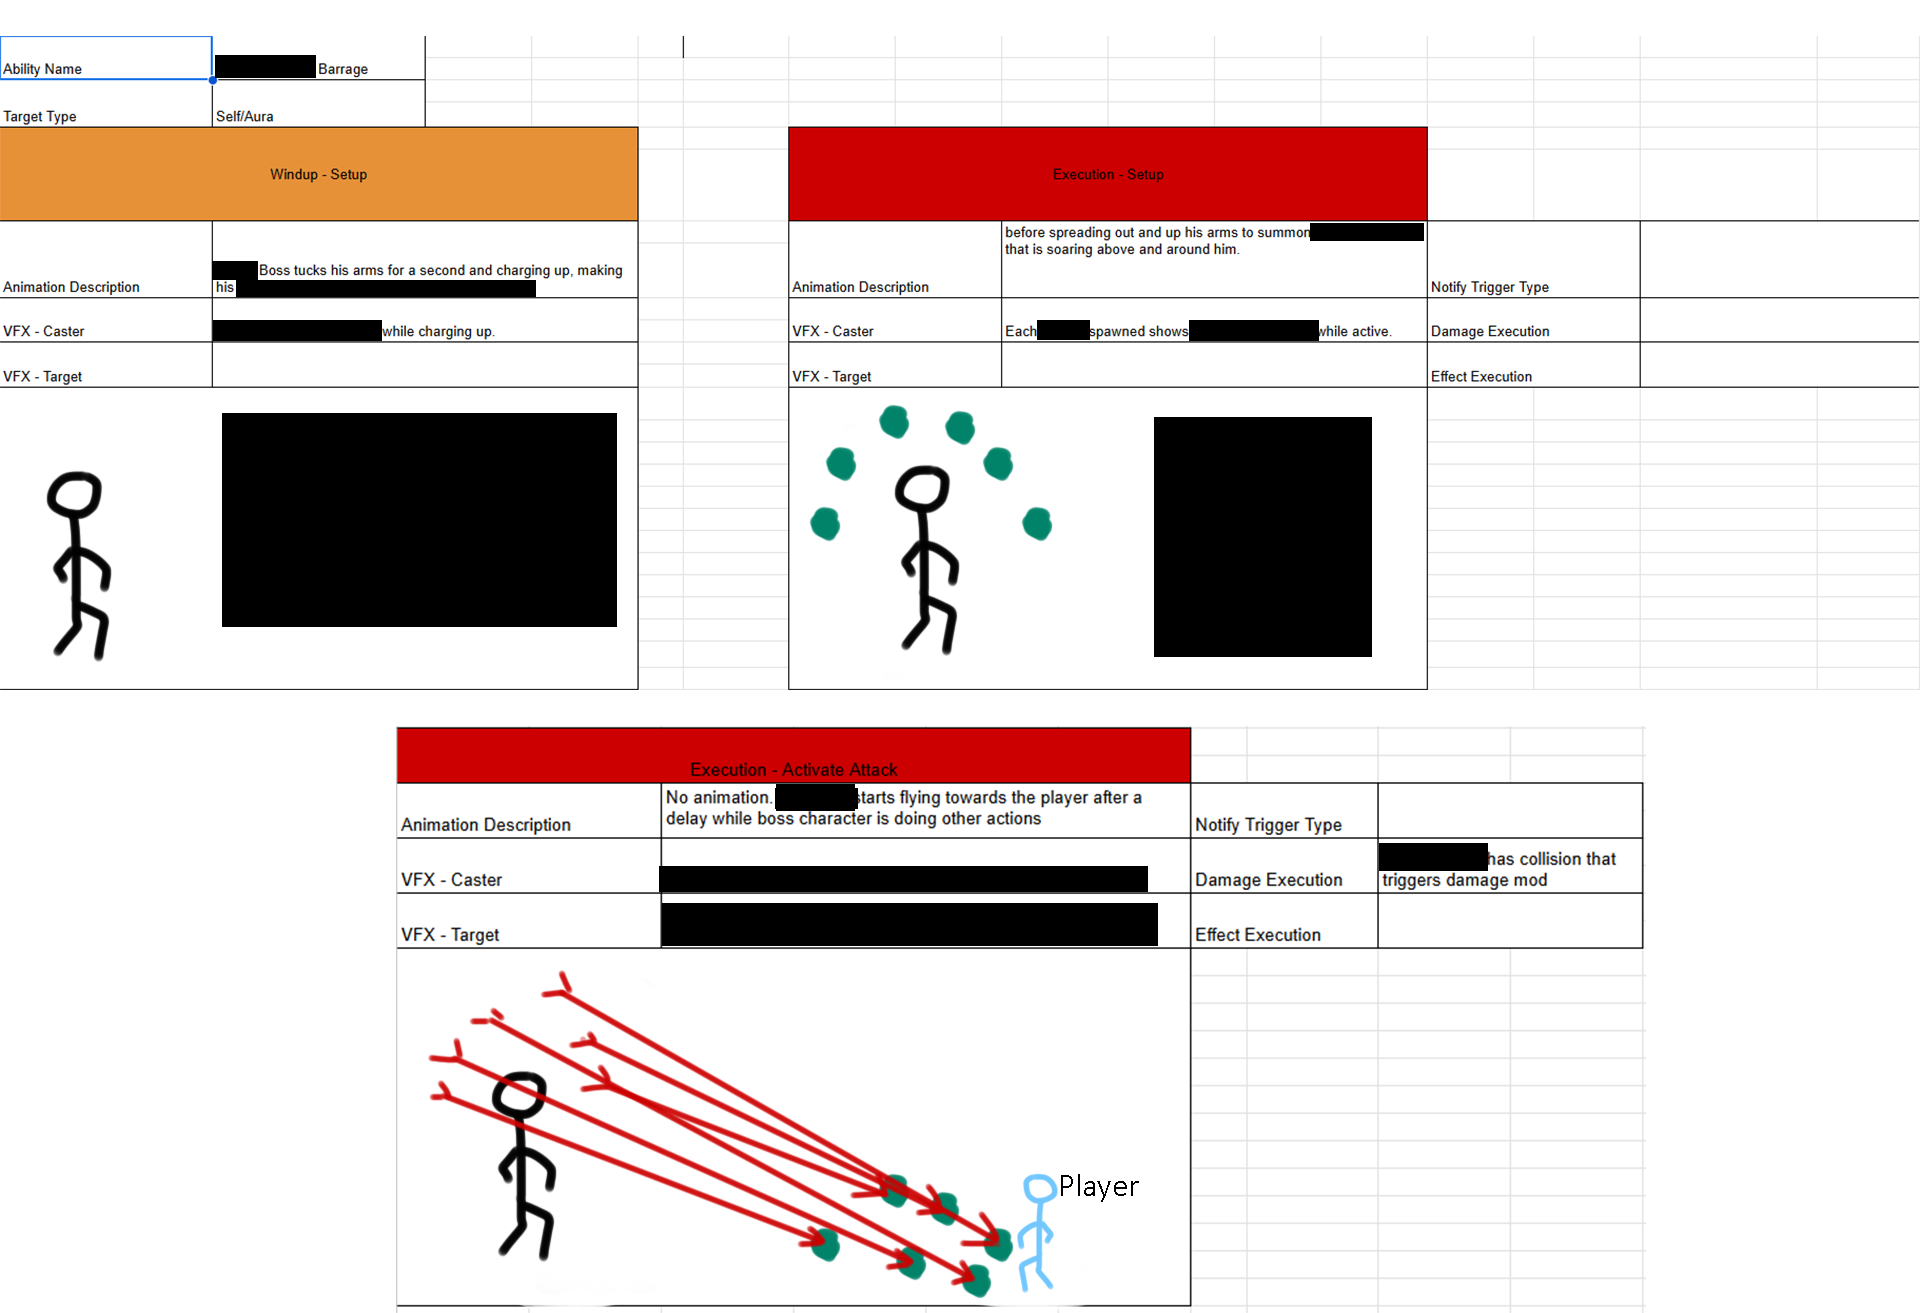
As an example, one of the boss’s abilities is documented using the same structure and format as the player ability system, allowing for consistency across both design and implementation. The image shown here is a highly simplified and stripped-down version of the original document.
Again, by structuring it this way, both artists and developers can quickly understand how the ability functions, what it needs in terms of animation, timing, VFX, and audio, and how it fits into the broader encounter. This shared documentation helps align everyone on execution while still giving room for creative input during production.
Tools used

Used Notion as our compendium of current and future enemies. Detailing the characteristics, behavior and list of attacks and abilities.
Photoshop was used to create visual explanation images to showcase intent of certain abilities.
Google Sheets was used as collaboration tool to visually communicate enemies characteristics and combat abilities.
Reflection
This experience has reinforced how much I enjoy designing layered systems that feed into one another — where actions taken out in the world ripple back into the player hub, and the tools gained there open new possibilities further down the line. I love building mechanics that not only feel rewarding in the moment, but also connect across different parts of the game to support long-term progression and player identity.
What made this even more rewarding was the opportunity to work toward a clear creative vision, while still being trusted with a high level of freedom and ownership. I’ve been able to brainstorm and design with intent, explore ideas, and receive thoughtful feedback that helped refine my work — all while seeing my designs scheduled for full implementation.
The amount of encouragement and positive feedback I’ve received from the team has been incredibly motivating, and it’s made me even more confident in pursuing thoughtful, systems-driven game design.
I’m excited to keep designing systems that connect across gameplay, teams, and players, and to keep building experiences that feel rewarding not just in the moment, but across the full arc of the game